Blog

  • Marmorkuchen mit Schokoglasur

    Marmorkuchen mit Schokoglasur

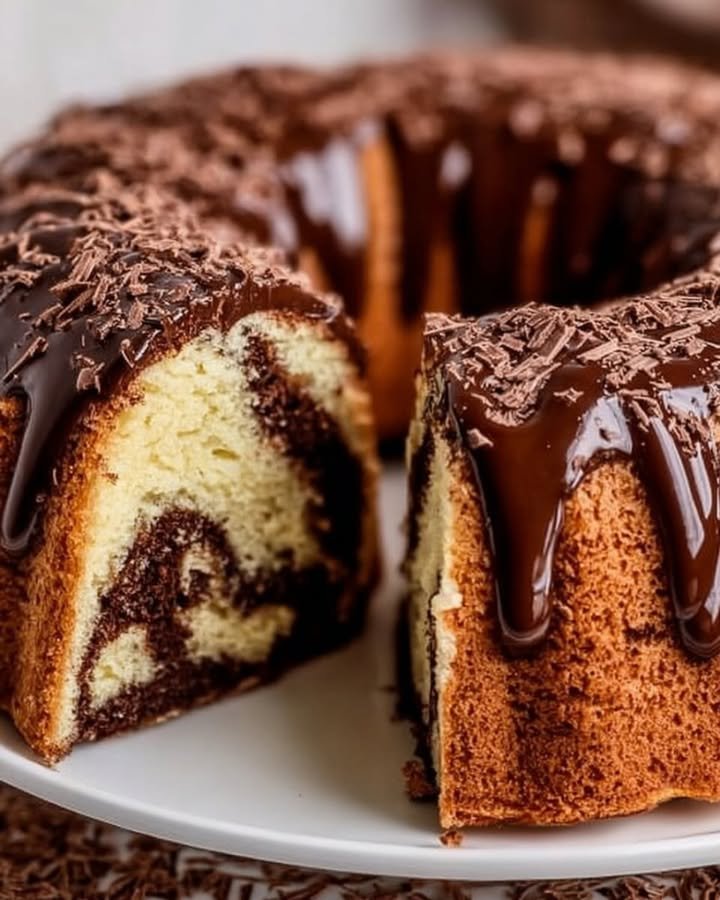
    Der perfekte Marmorkuchen mit Schokoglasur: Einfach, schnell und traditionell

    Einleitung

    Könntest du dir einen gemütlichen Sonntag ohne einen duftenden Marmorkuchen mit Schokoglasur vorstellen? Die Vorstellung, den Küchenraum mit dem wunderbaren Aroma frisch gebackenen Kuchens zu füllen, sorgt für ein wohliges Gefühl. Ob nach einem langen Arbeitstag, beim Treffen mit Freunden oder an einem kühlen Winterabend – Marmorkuchen mit Schokoglasur ist der perfekte Begleiter. Diese Delikatesse vereint die Cremigkeit der Butter und die Süße des Zuckers mit einem Hauch von Schokolade, die beim ersten Bissen zu einem unverwechselbaren Geschmackserlebnis verschmilzt. Lass uns gemeinsam in die Welt dieser köstlichen und zugleich unkomplizierten Backkunst eintauchen!

    Hintergrund & Ursprung des Rezepts

    Marmorkuchen hat eine lange Tradition in der deutschen Küche und begeistert seit Generationen Groß und Klein. Ursprünglich stammt das Rezept von der Idee, zwei verschiedene Teige in einer Form zu vereinen, um eine ansprechende Marmoroptik zu erzielen. Diese raffinierte Technik verleiht dem Kuchen nicht nur sein charakteristisches Aussehen, sondern auch einen wunderbaren Geschmacksreichtum. Die zeitlose Beliebtheit verdankt der Marmorkuchen auch der Tatsache, dass er einfach zuzubereiten ist und mit wenigen Zutaten auskommt. Mein Rezept ist eine besondere Variante, die durch die köstliche Schokoladenglasur noch mehr Genuss verspricht.

    Zutatenliste

    Für einen saftigen Marmorkuchen mit Schokoglasur benötigst du folgende Zutaten:

    • 300 g Weizenmehl (vorzugsweise Type 405)
    • 250 g Zucker (fein)
    • 250 g weiche Butter (zimmerwarm)
    • 5 Eier (Größe M)
    • 1 Pck. Backpulver
    • 1 Prise Salz
    • 2 EL Backkakao (dunkel, ungesüßt)
    • 200 g Schokolade (Zartbitter oder Vollmilch, fein gehackt)
    • 100 ml Sahne (Schlagsahne)

    Schritt-für-Schritt-Anleitung

    1. Heize den Ofen auf 180°C (Ober-/Unterhitze) vor und fette eine Kastenform gründlich mit Butter ein.
    2. In einer großen Schüssel vermenge das Weizenmehl, den Zucker, die weiche Butter, die Eier, das Backpulver und eine Prise Salz. Verrühre alles gründlich, bis eine glatte Masse entsteht, die cremig ist und gut zusammenhält (ca. 3-4 Minuten mit einem Handmixer).
    3. Teile den Teig gleichmäßig in zwei Hälften. Füge den Backkakao zu einer der Hälften hinzu und rühre gut um, bis der Kakao vollständig eingearbeitet ist.
    4. Gib die beiden Teighälften abwechselnd in die Kastenform – beginne mit der hellen Teighälfte, gefolgt von einer dunklen. Wiederhole dies, bis beide Teige aufgebraucht sind.
    5. Nimm eine Gabel und ziehe vorsichtig durch den Teig, um ein Marmormuster zu erstellen. Sei hierbei kreativ und achte darauf, dass die Farben gut miteinander vermischt sind, ohne dass es eine homogene Masse wird.
    6. Backe den Kuchen im vorgeheizten Ofen für 50-60 Minuten. Mache die Zahnstocherprobe: Wenn er sauber herauskommt, ist der Kuchen fertig.
    7. Nimm den Kuchen aus dem Ofen und lass ihn in der Form für ca. 15 Minuten abkühlen, bevor du ihn auf ein Kuchengitter stürzt, um vollständig abzukühlen.
    8. Für die Glasur: Schmelze die Schokolade zusammen mit der Sahne im Wasserbad, bis sie schön cremig und glänzend ist.
    9. Gieße die Schokoladenglasur über den abgekühlten Kuchen und lass sie etwas fest werden, bevor du ihn servierst.

    Marmorkuchen mit Schokoglasur

    Profi-Tipps & Häufige Fehler

    • Perfekte Konsistenz: Achte darauf, dass die Butter wirklich zimmerwarm ist, damit sie sich gut mit den anderen Zutaten verbindet.
    • Intensiveren Geschmack: Verwende hochwertige Schokolade und frische Eier für maximalen Genuss.
    • Fehler vermeiden: Lass den Kuchen genügend abkühlen, bevor du die Glasur aufträgst, um ein Durchweichen zu verhindern.
    • Küchenhacks: Wenn du den Kuchen schneller abkühlen lassen möchtest, stelle ihn in einen kühlen Raum oder auf einen Balkon (aber nicht in die Sonne!).

    Variationen & Abwandlungen

    • Vegan: Ersetze die Eier durch Leinsamen oder Apfelmus und die Butter durch vegane Margarine.
    • Glutenfrei: Benutze glutenfreies Mehl anstelle von Weizenmehl.
    • Low Carb: Tausche den Zucker gegen Erythrit oder andere Zuckerersatzstoffe aus und verwende Mandelmehl anstelle von Weizenmehl.
    • Extra cremig: Füge etwas Quark oder griechischen Joghurt in den Teig für mehr Feuchtigkeit hinzu.
    • Scharf: Ein Hauch von Chili-Pulver in der Glasur kann eine aufregende Note hinzufügen.
    • Budgetfreundlich: Nutze einfache Zutaten, die du bereits zu Hause hast.
    • Kinderfreundlich: Verwende bunte Streusel als Garnitur für mehr Spaß!

    Serviervorschläge

    Zu deinem Marmorkuchen passen wunderbar:

    • Eine Tasse frisch gebrühten Kaffee oder Tee.
    • Ein frischer Obstsalat als leichte Beilage.
    • Für Gäste: Serviere ihn auf einer schönen Tortenplatte, garniert mit ein paar frischen Beeren.

    Aufbewahrung, Einfrieren & Aufwärmen

    • Kühlschrank-Haltbarkeit: Der Kuchen bleibt im Kühlschrank bis zu einer Woche frisch.
    • Einfrieren: Du kannst den Marmorkuchen problemlos einfrieren. Wickele ihn gut in Frischhaltefolie ein, damit er keinen Geruch annimmt.
    • Aufwärmen: Um das Aroma zu verstärken, erwärme die Stücke kurz in der Mikrowelle oder im Ofen.
    • Meal-Prep-Tipps: Bereite den Teig am Vorabend vor und backe ihn am nächsten Tag frisch.

    Nährwerte & Gesundheitsaspekte

    Dieser köstliche Marmorkuchen hat viele Kalorien, aber du kannst ihn auch leichter gestalten, wenn du weniger Zucker und Butter verwendest. Mit Alternativen wie Apfelmus oder Joghurt kannst du den Kaloriengehalt deutlich senken, ohne den Geschmack zu beeinträchtigen.

    FAQ – Häufige Fragen

    1. Kann ich das Rezept vorbereiten?
      Ja, der Teig kann bis zu einem Tag im Voraus zubereitet und im Kühlschrank aufbewahrt werden.

    2. Welche Zutaten lassen sich ersetzen?
      Butter kann durch Margarine oder pflanzliche Öle und Zucker durch Erythrit ersetz werden.

    3. Was tun, wenn die Sauce zu dick oder zu flüssig wird?
      Vermenge einfach einen kleinen Schuss Sahne, um die Konsistenz anzupassen.

    4. Kann ich das Rezept verdoppeln?
      Ja, du kannst die Menge einfach verdoppeln und in einer größeren Form backen.

    5. Welche Beilagen passen dazu?
      Sahne, Eis oder frisches Obst harmonieren hervorragend.

    6. Funktioniert das Rezept auch ohne Sahne/Butter/Fleisch?
      Ja, das Rezept bleibt geschmacklich und textlich stabil, auch wenn du die Sahne oder Butter ersetzt.

    7. Welche Pfanne oder welches Gerät eignet sich?
      Eine klassische Kastenform eignet sich am besten, aber du kannst auch Muffinförmchen verwenden.

    Marmorkuchen mit Schokoglasur

    Abschluss

    Ich freue mich riesig darauf, wenn du diesen köstlichen Marmorkuchen mit Schokoglasur ausprobierst! Teile gerne deine Erfahrungen, Kommentare oder ein Foto auf Social Media. Viel Freude beim Kochen und guten Appetit!

  • Goulash

    Goulash

    Goulash

    Goulash is more than just a meal; it’s a hearty, warming dish that tells a story of comfort and tradition. This popular stew, originating from Hungary, is perfect for sharing with family and friends. In this article, we will explore how to make the ultimate goulash recipe, packed with rich flavors that will have everyone asking for seconds!

    A Hearty Dish for Every Occasion

    Goulash is a versatile dish that can be served on cold winter nights or at family gatherings. Its rich flavors come from tender beef, savory vegetables, and a blend of spices that create a comforting bowl of delight. Whether you’re a seasoned chef or a cooking novice, this recipe is designed to be straightforward and delicious!

    🧂 Ingredients:

    • 2 lbs beef chuck, cut into cubes
    • 2 tablespoons vegetable oil
    • 2 onions, chopped
    • 3 cloves garlic, minced
    • 2 tablespoons paprika
    • 1 teaspoon caraway seeds
    • 4 cups beef broth
    • 1 can (14.5 oz) diced tomatoes
    • 2 bell peppers, chopped
    • 2 carrots, sliced
    • Salt and pepper to taste
    • Fresh parsley for garnish

    👩‍🍳 Directions:
    1️⃣ Sear the Beef: In a large pot, heat the vegetable oil over medium-high heat. Add the beef cubes and season with salt and pepper. Sear the beef until it’s browned on all sides (about 5-7 minutes).

    2️⃣ Add Aromatics: Once the meat is browned, add the chopped onions and minced garlic to the pot. Sauté for about 3-5 minutes until the onions are translucent.

    3️⃣ Incorporate Spices: Sprinkle the paprika and caraway seeds over the meat and onion mixture. Stir well to combine, allowing the spices to toast for about 1-2 minutes.

    4️⃣ Pour in the Broth: Carefully add the beef broth and canned diced tomatoes to the pot, bringing the mixture to a boil.

    5️⃣ Simmer with Vegetables: Once boiling, reduce the heat to low and add the chopped bell peppers and sliced carrots. Cover and let simmer for about 1.5 to 2 hours, stirring occasionally until the beef is tender.

    6️⃣ Finalize the Flavor: Taste the goulash and adjust the seasoning with more salt and pepper if necessary.

    7️⃣ Serve: Ladle the goulash into bowls and garnish with fresh parsley.

    Goulash

    💡 Tips & Variations:

    • Adjusting the Thickness: If you prefer a thicker goulash, remove the lid during the last 30 minutes of cooking to let it reduce.
    • Vegetarian Option: Substitute beef with lentils, mushrooms, or other hearty vegetables for a vegetarian version of goulash.
    • Spice it Up: For those who enjoy some heat, add a diced jalapeño or a dash of cayenne pepper to the mix.

    Goulash

    FAQ

    Q1: Can I make goulash ahead of time?
    Yes! Goulash tastes even better the next day as the flavors meld together. Just store it in an airtight container in the refrigerator for up to three days, or you can freeze it for longer storage.

    Q2: What can I serve with goulash?
    Goulash pairs perfectly with crusty bread, buttery egg noodles, or even a side of mashed potatoes to soak up the delicious sauce.

    Q3: Can I use different cuts of beef?
    While beef chuck is ideal for this recipe due to its tenderness after slow cooking, you can use other cuts like brisket or round. Just ensure they have enough marbling for flavor and tenderness.

    Conclusion

    Making goulash at home is surprisingly easy and incredibly rewarding. With its rich and hearty flavors, this dish is sure to become a family favorite. So, why not give it a try? Gather your ingredients, follow the steps, and serve up this comforting stew at your next meal gathering!

    👉 Try it now and share your experience in the comments below! What variations did you choose, and how did your family enjoy this delightful dish?

  • German Roulades

    German Roulades

    German Roulades

    If you’re searching for a hearty and comforting dish that brings the flavors of Germany into your kitchen, look no further than German Roulades. This traditional dish features tender beef rolled around savory fillings, resulting in a meal that’s as delicious as it is satisfying. Perfect for family gatherings or a cozy dinner, let’s dive into how to make this delightful classic!

    German Roulades are more than just a dish; they are a celebration of flavors and culinary tradition. The combination of beef, bacon, onion, and pickle, all slathered in mustard, creates a symphony of taste that is both rich and comforting. As you sink your teeth into these juicy rolls, you’ll be transported to the heart of Germany, where local ingredients and time-honored recipes combine to produce unforgettable meals. Let’s get started on creating this delicious dish right at home!

    Ingredients:

    • 8 slices of beef (flank or round)
    • 4 slices of bacon
    • 1 onion, sliced
    • 1 dill pickle, sliced
    • 2 tablespoons mustard
    • Salt and pepper to taste
    • 2 tablespoons vegetable oil
    • 2 cups beef broth
    • 1 tablespoon flour (optional for thickening)
    • Fresh parsley for garnish

    Directions:

    1️⃣ Prepare the Beef: Start by lightly pounding the beef slices to ensure they are tender and easy to roll. Season both sides with salt and pepper, and spread a thin layer of mustard on each slice.

    2️⃣ Add Fillings: Place a slice of bacon, a few onion slices, and a couple of dill pickle slices in the center of each beef slice.

    3️⃣ Roll and Secure: Roll each slice tightly around the fillings, securing them with toothpicks or kitchen twine to keep everything in place during cooking.

    4️⃣ Brown the Roulades: In a large skillet, heat 2 tablespoons of vegetable oil over medium-high heat. Add the beef roulades and brown them on all sides for about 5-7 minutes.

    5️⃣ Simmer: Once browned, carefully add 2 cups of beef broth to the skillet. Bring it to a gentle simmer, cover the skillet, and let the roulades cook for about 1 to 1.5 hours, or until the beef is tender.

    6️⃣ Optional Thickening: If you prefer a thicker sauce, you can mix 1 tablespoon of flour with a bit of cold water and stir it into the broth during the last 10 minutes of cooking.

    7️⃣ Serve: Remove the roulades from the skillet and let them rest for a few minutes before slicing. Garnish with fresh parsley and serve with your favorite sides such as potatoes or a fresh salad.

    German Roulades

    Tips & Variations:

    • Meat Alternatives: You can use pork or turkey as a substitute for beef, offering a unique twist on this traditional dish.
    • Vegetable Additions: For extra flavor, feel free to add carrots or bell peppers to the filling. They can provide a nice sweetness and texture contrast.
    • Cooking Methods: If you’re short on time, consider using a pressure cooker for quicker results. The flavors will meld beautifully in this method too.
    • Sauce Variations: Add a splash of red wine or cream to the broth for a richer sauce.

    German Roulades

    FAQ

    1. Can I make German Roulades ahead of time?
    Yes! You can prepare the roulades, brown them, and simmer them ahead of time. Just reheat before serving for a quick meal.

    2. What sides do you recommend serving with Roulades?
    Traditional sides include potato dumplings, spaetzle, or simply boiled potatoes. A side of steamed vegetables also pairs nicely!

    3. Can I freeze leftover Roulades?
    Absolutely! Let them cool completely, then store them in an airtight container in the freezer. They will last for about 3 months.

    4. How do I prevent the roulades from unrolling during cooking?
    Ensuring you secure them tightly with toothpicks or twine is key. Browning them well can also help to keep the filling intact.

    Conclusion

    Now that you’ve learned how to make delicious German Roulades, it’s time to bring a taste of Germany to your table! This dish is sure to impress your family and friends, making any meal a special occasion. Gather your ingredients and start cooking today.

    👉 Try it now and share your experience with us! We’d love to hear how your roulades turned out!

  • Roast Pork

    Roast Pork

    Roast Pork

    Roast pork is a culinary delight that never goes out of style. Whether it’s a festive occasion or a simple family dinner, this melt-in-your-mouth dish is sure to be the star of your table. In this article, we’ll guide you through a juicy and flavorful roast pork recipe that anyone can master. So, roll up your sleeves and get ready to impress!

    The Perfect Roast Pork Recipe

    🧂 Ingredients:

    • 2 kg pork shoulder
    • Salt
    • Pepper
    • 2 onions, sliced
    • 2 cloves garlic, minced
    • 2 cups chicken or beef broth
    • 1 tablespoon vegetable oil
    • Fresh herbs (such as thyme and rosemary)

    👩‍🍳 Directions:

    1️⃣ Preparations:

    • Preheat your oven to 160°C (320°F).
    • Pat the pork shoulder dry and season generously with salt and pepper.

    2️⃣ Sear the Pork:

    • In a large ovenproof pot or dutch oven, heat the vegetable oil over medium-high heat.
    • Add the pork shoulder, searing it on all sides until it’s beautifully browned. This step locks in the flavors and juices.

    3️⃣ Add Garlic and Onions:

    • Once the pork is browned, remove it temporarily from the pot.
    • Add the sliced onions and minced garlic to the pot, stirring until they are fragrant and softened, about 2–3 minutes.

    4️⃣ Combine and Pour:

    • Place the pork back into the pot with the onions and garlic.
    • Pour in the chicken or beef broth, ensuring the meat is partially submerged.

    5️⃣ Herb Infusion:

    • Tuck fresh herbs like thyme and rosemary around the pork shoulder for added aroma and flavor.

    6️⃣ Slow Roast:

    • Cover the pot with a lid or foil and place it in the preheated oven.
    • Roast for about 3–4 hours or until the pork is fork-tender. The longer you cook, the more tender it will become.

    7️⃣ Rest and Serve:

    • Once cooked, remove the pot from the oven and let it rest for 15–20 minutes before slicing. This allows the juices to redistribute throughout the meat.
    • Serve with your favorite sides and enjoy!

    Roast Pork

    💡 Tips & Variations:

    • Marinade Magic: For extra flavor, marinate the pork shoulder in a blend of spices and herbs for at least a few hours or overnight before cooking.
    • Spiced Up: Consider adding spices such as paprika, cumin, or even a dash of chili powder to the seasoning for a unique twist on your roast.
    • Crispy Skin: If you prefer crispy skin, uncover the pot for the last 30 minutes of roasting to allow the skin to brown up nicely.

    Roast Pork

    FAQ

    Q: Can I use a different cut of pork?
    A: Absolutely! While pork shoulder is ideal for its marbling and flavor, cuts like pork loin can also work. Just be aware of cooking times, as they may vary.

    Q: How do I store leftovers?
    A: Store leftover roast pork in an airtight container in the refrigerator for up to 4 days. You can also freeze it for longer storage!

    Q: What sides go well with roast pork?
    A: Popular sides include mashed potatoes, roasted vegetables, or a fresh garden salad. Feel free to get creative with your pairings!

    Q: Can I make this dish in a slow cooker?
    A: Yes, you can! Simply follow the initial searing step, then transfer everything to a slow cooker and cook on low for 6-8 hours until tender.

    👉 Try it now! Experience the succulent flavors of this roast pork recipe in your own kitchen. Don’t forget to share your roast pork experience with us in the comments below! Enjoy your culinary adventure!

  • Festive German Stollen

    Festive German Stollen

    Festive German Stollen

    As the holiday season approaches, many of us look forward to delightful traditions and baked treats that warm our hearts and homes. One of the most beloved confectioneries to emerge from Germany during Christmas time is the Festive German Stollen. This rich, dense bread is loaded with dried fruits and nuts, then dusted with powdered sugar to create a winter wonderland effect. If you’re looking to impress guests at your holiday gatherings or want to bring a taste of Germany into your kitchen, this recipe is for you!

    The Magic of Stollen: A Brief Introduction

    Stollen has a rich history that dates back to the 14th century when it was first made in Germany. Traditionally shaped like a baby Jesus wrapped in swaddling clothes, this festive bread symbolizes the season and is often enjoyed with family and friends. Today, many variations exist, but the core ingredients remain the same. Let’s dive into how to create your very own Festive German Stollen at home!

    🧂 Ingredients:

    To recreate this traditional treat, you’ll need the following ingredients:

    • 4 cups all-purpose flour
    • 1 1/2 teaspoons active dry yeast
    • 1/2 cup milk
    • 1/2 cup sugar
    • 1/2 teaspoon salt
    • 1 teaspoon ground cinnamon
    • 1/4 teaspoon ground nutmeg
    • 1/2 cup unsalted butter
    • 1/2 cup mixed dried fruit (raisins, currants, candied orange peel)
    • 1/2 cup chopped nuts (almonds, walnuts)
    • 1/4 cup rum or brandy
    • 1/2 teaspoon vanilla extract
    • Powdered sugar (for dusting)

    👩‍🍳 Directions:

    1️⃣ Prepare the Yeast: In a small bowl, warm the milk until it’s lukewarm. Stir in the active dry yeast and a teaspoon of sugar, then let it sit for about 5-10 minutes until frothy.

    2️⃣ Mix Dry Ingredients: In a large mixing bowl, whisk together the flour, remaining sugar, salt, ground cinnamon, and ground nutmeg.

    3️⃣ Cream Butter: In another bowl, beat the unsalted butter until creamy. Then, stir in the frothy yeast mixture, vanilla extract, and rum or brandy.

    4️⃣ Combine Mixtures: Gradually add the wet ingredients to the dry ingredients. Mix until a dough begins to form.

    5️⃣ Add Fruits and Nuts: Fold in the mixed dried fruits and chopped nuts until evenly distributed throughout the dough.

    6️⃣ Knead the Dough: Transfer the dough to a floured surface and knead for about 5-7 minutes until it becomes smooth and elastic.

    7️⃣ First Rise: Place the kneaded dough in a lightly greased bowl, cover it with a clean kitchen towel, and let it rise in a warm location for about 1-2 hours, or until it has doubled in size.

    8️⃣ Shape the Stollen: Once risen, punch down the dough to release the air. Shape it into an oval, then fold it over slightly to create the classic Stollen shape.

    9️⃣ Final Rise: Cover the shaped dough and let it rise for another 30-45 minutes.

    🔟 Bake: Preheat your oven to 350°F (175°C). Bake the Stollen for 30-35 minutes or until golden brown.

    1️⃣1️⃣ Cool and Dust: Once baked, allow it to cool on a wire rack. Once cooled, generously dust it with powdered sugar for that magical snowy effect.

    Festive German Stollen

    💡 Tips & Variations:

    • Fruits and Nuts: Feel free to customize your Stollen! Try using different dried fruits like apricots or figs, or experiment with various nuts based on your preferences.

    • Soaked Fruits: For an extra burst of flavor, soak your dried fruits in rum or brandy overnight prior to baking. This will enhance their natural sweetness and add a delightful richness to the bread.

    • Storage: Wrapped tightly, Stollen can last for several weeks, making it a fantastic gift for friends and family!

    • Gluten-Free Option: Substitute all-purpose flour with a gluten-free flour blend to cater to gluten-sensitive guests!

    📸 Preparing Your Festive Stollen

    Festive German Stollen

    FAQ

    Q: Can I add more spices to the recipe?
    A: Absolutely! Feel free to experiment with spices like allspice, ginger, or even a dash of cloves to create your unique flavor profile.

    Q: How long does Stollen last?
    A: When stored properly in an airtight container, Stollen can last 2-3 weeks and even improves in flavor as it ages!

    Q: Can I freeze Stollen?
    A: Yes! You can freeze Stollen before or after baking. Just make sure to wrap it well in plastic wrap and then place it in an airtight container or freezer bag.

    Q: Is Stollen served warm or cold?
    A: Stollen can be enjoyed both ways! Warm it slightly in the oven or enjoy it cold with a cup of tea or coffee.

    👉 Ready to bake your own Festive German Stollen? Try this recipe and bring a slice of German tradition to your home this holiday season! Share your experience with us in the comments below, and don’t forget to spread the word to your friends! Happy baking!

  • German Fried Potatoes

    German Fried Potatoes

    German Fried Potatoes

    German Fried Potatoes, also known as "Bratkartoffeln," are a hearty and flavorful dish that boasts the perfect combination of crispy texture and savory taste. This iconic side dish is not only a staple in German cuisine but also a beloved favorite around the world. If you’re looking to add a delicious twist to your meals, German Fried Potatoes are a fantastic option that pairs well with various main courses.

    Discover the Deliciousness of German Fried Potatoes

    If you’re a fan of comforting, soul-warming dishes, then prepare your taste buds for a delight! This recipe for German Fried Potatoes will transport you straight to a cozy German kitchen, where the scent of sizzling bacon and crispy potatoes fills the air. Not only is this dish simple to make, but it also elevates any meal with its rich flavors and delightful crunch.

    🧂 Ingredients:

    • 4 large potatoes, peeled and sliced
    • 4 slices of bacon, chopped
    • 1 onion, diced
    • Salt to taste
    • Pepper to taste
    • Fresh parsley for garnish (optional)

    👩‍🍳 Directions:
    1️⃣ Prepare the Potatoes: Start by washing and peeling the potatoes. Slice them into thin, even pieces to ensure they cook uniformly. Rinse the sliced potatoes in cold water and pat them dry with a kitchen towel to remove excess moisture.

    2️⃣ Cook the Bacon: In a large skillet, fry the chopped bacon over medium heat until it becomes crispy. This will add a delicious flavor to your potatoes later. Once done, remove the bacon from the skillet and set it aside, leaving the rendered fat in the pan.

    3️⃣ Sauté the Onions: In the same skillet with the bacon fat, add the diced onions. Sauté them until they are translucent and slightly golden, which should take about 3-5 minutes. This will add a lovely sweetness to the dish.

    4️⃣ Fry the Potatoes: Add the sliced potatoes to the skillet, spreading them out evenly. Season with salt and pepper to taste. Allow them to cook undisturbed for about 5-7 minutes until the bottom side is golden brown.

    5️⃣ Flip & Stir: Carefully flip the potatoes (you might want to use a spatula or tongs). Continue to cook for another 5-7 minutes until the second side is crispy and golden. You may need to stir occasionally to ensure they cook evenly.

    6️⃣ Combine Ingredients: Once the potatoes are cooked to your liking, add the crispy bacon back into the skillet. Mix gently until everything is well combined.

    7️⃣ Garnish & Serve: Sprinkle fresh parsley before serving for a pop of color and added flavor. Enjoy your German Fried Potatoes hot!

    German Fried Potatoes

    💡 Tips & Variations:

    • For an extra crispy texture, you can parboil the potatoes before slicing and frying them. This helps create a fluffy interior while still achieving that crispy exterior.
    • Feel free to experiment with different herbs and spices. Adding some thyme or paprika can elevate the flavor profile of your dish.
    • Try adding bell peppers or mushrooms to the mix for an added layer of flavor and nutrition.
    • If you want a vegetarian version, you can substitute bacon with smoked tofu or a plant-based bacon alternative.

    German Fried Potatoes

    FAQ

    1. Can I use any type of potatoes for this recipe?
    Yes, while starchy potatoes like Russets or Yukon Gold work best for achieving that crispy texture, you can use other types too.

    2. How should I store leftover German Fried Potatoes?
    Store leftovers in an airtight container in the fridge for up to 3 days. To reheat, pan-fry them again to regain their crispiness.

    3. Can I make this dish in advance?
    German Fried Potatoes are best enjoyed fresh, but you can prepare the potatoes and onions ahead of time. Just fry them just before serving.

    4. What can I serve with German Fried Potatoes?
    These delicious potatoes pair perfectly with grilled meats, sausages, or even a fresh salad for a lighter meal.

    👉 Try it now: Now that you have this easy recipe for German Fried Potatoes, why not bring a taste of Germany into your kitchen? Prepare this delicious dish for your next family meal, and don’t forget to share your experience! We’d love to hear how your German Fried Potatoes turned out!

  • Hunter’s Schnitzel

    Hunter’s Schnitzel

    Hunter’s Schnitzel

    When you think of comfort food, few dishes can compete with the warmth and deliciousness of a perfectly cooked schnitzel. One variation that stands out is Hunter’s Schnitzel, a delightful dish that elevates the classic schnitzel with the savory addition of mushrooms and creamy sauce. This article will guide you through the steps of preparing Hunter’s Schnitzel, along with some tips to make your cooking experience even better!

    What is Hunter’s Schnitzel?

    Hunter’s Schnitzel, or Jagdwurst, originates from traditional German and Austrian cuisines. This dish typically features tender schnitzel topped with mushrooms and a rich creamy sauce, making it an irresistible meal for any occasion. Perfect for weeknight dinners or gatherings, this recipe is sure to impress your guests while satisfying your own cravings.

    🧂 Ingredients:

    • Boneless pork cutlets: 4
    • Flour: 1⁄2 cup (60 g)
    • Egg: 1, beaten
    • Breadcrumbs: 1 cup (100 g)
    • Mushrooms: 1 cup (100 g), sliced
    • Butter: 2 tbsp (30 g)
    • Cream: 1⁄2 cup (120 ml)
    • Onion: 1 small, diced
    • Salt and pepper to taste

    👩‍🍳 Directions:
    1️⃣ Prepare the schnitzel: Start by tenderizing the boneless pork cutlets using a meat mallet. Aim for a uniform thickness of about 1/4 inch. Season both sides with salt and pepper.

    2️⃣ Bread the schnitzel: Set up a breading station with three shallow dishes. In the first dish, add the flour. In the second, pour the beaten egg. In the third, place the breadcrumbs. Dredge each cutlet in flour, dip it into the beaten egg, then coat it with breadcrumbs. Make sure to press the breadcrumbs onto the meat for a better crust.

    3️⃣ Fry the schnitzel: In a large skillet, heat oil over medium heat. Add the breaded schnitzels, cooking until golden brown on both sides (about 3-4 minutes per side). Transfer the cooked schnitzels to a paper towel-lined plate to drain excess oil.

    4️⃣ Prepare the sauce: In the same skillet, melt the butter over medium heat. Add the diced onion and sliced mushrooms, sautéing until the mushrooms are soft and golden. Pour in the cream and stir everything together, letting it simmer for a few minutes. Season with salt and pepper to taste.

    5️⃣ Assemble the dish: Serve the schnitzels hot, topped with the creamy mushroom sauce. Garnish with fresh herbs, if desired.

    Hunter's Schnitzel

    💡 Tips & Variations:

    • Meat options: While pork is traditional, you can also use chicken or turkey cutlets for a leaner variation.
    • Vegan alternative: For a vegan option, consider using plant-based breaded cutlets and a cream alternative made from cashews or soy.
    • Add herbs: Enhance the flavor of your creamy sauce by incorporating fresh herbs like parsley or thyme.
    • Side dishes: Pair Hunter’s Schnitzel with mashed potatoes, spaetzle, or a fresh green salad for a well-rounded meal.

    Hunter's Schnitzel

    FAQ

    Q: Can I make Hunter’s Schnitzel in advance?
    A: Yes! You can bread and fry the schnitzels ahead of time and store them in the refrigerator. Just reheat in the oven before serving, and prepare the mushroom sauce fresh.

    Q: What type of mushrooms work best?
    A: Traditional options include button or cremini mushrooms, but feel free to experiment with different varieties for a unique flavor profile.

    Q: Can I freeze the leftovers?
    A: Yes, you can freeze the schnitzels and mushroom sauce separately. Thaw in the refrigerator and reheat gently when ready to serve.

    Q: How do I know when the schnitzel is cooked through?
    A: The schnitzel should be golden brown and reach an internal temperature of at least 145°F (63°C). You can check using a meat thermometer.

    👉 Try it now! Experience the mouthwatering flavors of Hunter’s Schnitzel and treat yourself and your loved ones to this heavenly dish. Share your experience in the comments below or tag us in your culinary creations! Happy cooking!

  • Fried meatballs

    Fried meatballs

    Fried Meatballs

    Creating the perfect fried meatballs can be a culinary delight that tantalizes the taste buds of your family and friends. Whether served as an appetizer, a hearty main dish, or tucked into a sub sandwich, these flavorful bites are sure to impress. Let’s dive into this delicious recipe that showcases the best of meat combined with essential spices and simple cooking techniques.

    The Art of Making Fried Meatballs

    Making fried meatballs isn’t just about combining ingredients; it’s about achieving a perfect balance of flavor and texture. This recipe is simple, allowing you to enjoy the process while creating something extraordinary.

    🧂 Ingredients:

    • 500g ground beef
    • 250g ground pork
    • 1 onion, finely chopped
    • 2 cloves garlic, minced
    • 1 egg
    • 100g breadcrumbs
    • Salt and pepper to taste
    • 1 tsp paprika
    • Oil for frying

    👩‍🍳 Directions:

    1. Prepare the Mixture: In a large mixing bowl, combine the ground beef and ground pork. Add the finely chopped onion, minced garlic, and egg. Beat the egg lightly before adding it to the mixture for even distribution.
    2. Season the Blend: Sprinkle in the breadcrumbs, salt, pepper, and paprika. These ingredients will add flavor and texture, so mix well until all components are thoroughly combined.
    3. Shape the Meatballs: With your hands, shape the mixture into small balls, about the size of a golf ball. This size will ensure even cooking and a perfect bite.
    4. Heat the Oil: In a large skillet, heat oil over medium-high heat. You’ll need enough oil to create a shallow layer that will fry the meatballs, usually around 1 cm deep.
    5. Fry the Meatballs: Once the oil is hot, carefully add the meatballs to the skillet. Fry them in batches to avoid overcrowding. Cook for about 6-8 minutes on each side, or until they are golden brown and cooked through.
    6. Drain: Once cooked, remove the meatballs from the skillet and let them drain on a paper towel to absorb any excess oil.

    Fried meatballs

    💡 Tips & Variations:

    • Cheese Stuffed: For a fun twist, try adding a small cube of mozzarella cheese inside each meatball before rolling them to create a gooey center.
    • Herbs for Freshness: Incorporate fresh herbs like parsley or basil into the mixture for added flavor and a pop of color.
    • Spicy Kick: If you enjoy spiciness, add red pepper flakes to the mixture for a kick.
    • Serve with Dipping Sauce: Pair these meatballs with a homemade marinara sauce, ranch, or your favorite dipping sauce for an extra explosion of flavor.

    Fried meatballs

    FAQ

    Q: Can I bake these meatballs instead of frying them?
    A: Absolutely! Preheat your oven to 200°C (400°F) and bake the meatballs on a grease-lined baking sheet for about 20-25 minutes, turning halfway for even browning.

    Q: Can I freeze the meatballs?
    A: Yes! Allow the cooked meatballs to cool completely, then store them in an airtight container. They can be frozen for up to three months. Thaw before reheating.

    Q: What do I serve with meatballs?
    A: Fried meatballs are versatile! Serve them over spaghetti, as a slider, with mashed potatoes, or on toothpicks at a party for a delightful appetizer.

    Q: Can I use only ground beef or ground pork?
    A: Yes, you can! Feel free to substitute either type of meat according to your preference, but be aware that this may alter the flavor and texture slightly.

    👉 Try it now! Gather your ingredients and whip up a batch of delicious fried meatballs. Share your experience in the comments below or post your creations on social media. Happy cooking!

  • German Potato Soup

    German Potato Soup

    German Potato Soup

    When the weather turns chilly and you’re craving something warm and comforting, there’s nothing quite like a hearty bowl of German Potato Soup. This creamy, flavorful dish combines the earthiness of potatoes with the savory notes of smoked sausage, making it a perfect meal for cold evenings. In this article, you’ll discover the classic recipe for this delightful soup, along with some tips and variations to make it your own!

    A Hearty Comfort Food

    German Potato Soup, or "Kartoffelsuppe," is a staple in many German households. It’s not only filling but also incredibly easy to prepare. Whether you’re serving it as a main dish for your family or as a starter at a dinner party, this soup is sure to impress. Let’s dive into the ingredients and the simple steps to create this delicious dish.

    🧂 Ingredients:

    • 4 medium potatoes, peeled and diced
    • 2 carrots, diced
    • 1 onion, chopped
    • 2 cloves garlic, minced
    • 1 smoked sausage, sliced
    • 4 cups vegetable or chicken broth
    • 1 cup heavy cream
    • 2 tablespoons olive oil
    • Salt and pepper to taste
    • Fresh herbs (such as parsley or thyme) for garnish

    👩‍🍳 Directions:
    1️⃣ Prepare the Vegetables: Begin by heating the olive oil in a large pot over medium heat. Add the chopped onion and minced garlic, sautéing until the onion becomes translucent—about 3 to 4 minutes.

    2️⃣ Add the Carrots and Potatoes: Throw in the diced carrots and potatoes, stirring them with the onion and garlic for another 5 minutes.

    3️⃣ Incorporate the Sausage: Add the sliced smoked sausage to the pot, allowing it to brown lightly before moving on to the next step.

    4️⃣ Pour in the Broth: Add the vegetable or chicken broth and bring the mixture to a boil. Once boiling, reduce the heat and let it simmer for about 20 minutes, or until the potatoes and carrots are soft.

    5️⃣ Blend the Soup (Optional): For a creamy texture, you can use an immersion blender to puree part of the soup, or you can transfer a portion to a traditional blender. Make sure to leave some chunks for added texture.

    6️⃣ Add the Cream: Stir in the heavy cream and season with salt and pepper to taste. Let the soup simmer for an additional 5 minutes to heat through.

    7️⃣ Serve: Ladle the soup into bowls and garnish with fresh herbs like parsley or thyme.

    German Potato Soup

    💡 Tips & Variations:

    • Vegetarian Option: Replace the smoked sausage with mushrooms or tofu for a vegetarian version.
    • Spicy Kick: Add a pinch of red pepper flakes or some chopped jalapeños for a spicy twist.
    • Storage: Leftover soup can be stored in an airtight container in the refrigerator for up to 3 days or frozen for up to 3 months.
    • Serving Suggestion: Serve with crusty bread or a side salad for a complete meal.

    German Potato Soup

    Frequently Asked Questions (FAQ)

    Q1: Can I use other types of potatoes?
    Yes! While Yukon Gold or Russet potatoes work beautifully, you can also experiment with red potatoes for a different texture.

    Q2: How can I make this soup thicker?
    To thicken the soup, you can blend in more potatoes, or add a cornstarch slurry (mix 1 tablespoon of cornstarch with 2 tablespoons of water) after the cream and allow it to simmer until thickened.

    Q3: What’s the best way to store leftovers?
    Store leftovers in an airtight container in the fridge for up to 3 days. You can also freeze the soup, though keep in mind the cream may separate upon reheating.

    Q4: Can I make this soup ahead of time?
    Absolutely! In fact, the flavors often deepen and improve when the soup is stored and reheated the next day.

    👉 Try it now! With this delicious and hearty German Potato Soup recipe, you can warm up your kitchen and your heart. Share your experiences and variations in the comments below—I’d love to hear how your version turned out! Enjoy every spoonful of this comforting classic.

  • German Feast (Sausage Platter with Sauerkraut)

    German Feast (Sausage Platter with Sauerkraut)

    German Feast (Sausage Platter with Sauerkraut)

    If you’re looking to bring a true taste of Germany to your dinner table, then look no further than a traditional German Feast featuring a hearty sausage platter accompanied by tangy sauerkraut. This assembly of flavors, textures, and aromas is sure to impress family and friends alike. Not only is this dish a feast for the senses, but it also reflects the rich culinary heritage of Germany. Let’s dive into how to create this delightful meal!

    A Taste of Tradition

    German cuisine is renowned for its robust flavors and hearty dishes, often centered around sausages and fermented vegetables. This sausage platter with sauerkraut can become a centerpiece for gatherings, festivals, or simply a cozy family dinner. Whether you are a seasoned chef or a kitchen novice, crafting this feast can be a rewarding experience.

    🧂 Ingredients

    To create your perfect German feast, gather the following ingredients:

    • Bratwurst: 4 links
    • Weißwurst (white sausages): 4 links
    • Smoked sausages (Kielbasa or Mettwurst): 2 links
    • Beer: 2 cups (500 ml)
    • Onion: 1, sliced
    • Butter or oil: 2 Tbsp (30 g)
    • Sauerkraut: 4 cups (900 g), drained
    • Onion: 1, chopped
    • Apple: 1, grated
    • Butter: 2 Tbsp (30 g)
    • White wine or apple juice: 1/2 cup (120 ml)
    • Caraway seeds: 1 tsp
    • Salt and pepper to taste
    • Sweet or spicy German mustard
    • Rye bread or pretzels
    • Mashed potatoes (optional)

    👩‍🍳 Directions

    Follow these simple steps to complete your German sausage platter:

    1. Prepare the Sausages: In a large skillet, heat 2 tablespoons of butter or oil over medium heat. Add the bratwurst, Weißwurst, and smoked sausages. Brown the sausages for about 10 minutes, turning occasionally until evenly cooked and crispy on the outside.

    2. Cook the Onions: Remove the sausages from the skillet and set aside. In the same skillet, add the sliced onion. Sauté until soft and translucent, about 5 minutes.

    3. Add Sauerkraut: Stir in the drained sauerkraut, chopped onion, grated apple, and caraway seeds. Cook for an additional 5 minutes until the mixture is heated through.

    4. Deglaze the Pan: Pour in the white wine (or apple juice) and add the sausages back to the skillet. Allow everything to simmer together for about 15 minutes, making sure the flavors meld beautifully. Season with salt and pepper to taste.

    5. Serve: Arrange the sausages and sauerkraut on a large serving platter. Serve alongside slices of rye bread or pretzels. If desired, add a side of mashed potatoes for a more filling meal.

    German Feast (Sausage Platter with Sauerkraut)

    💡 Tips & Variations

    • Sausage Varieties: Feel free to mix and match your favorite types of sausages. You can even experiment with specialty flavors.
    • Vegetarian Option: For a vegetarian twist, consider using plant-based sausages and making sure your sauerkraut is free of meat products.
    • Beer Pairing: Pair your feast with a classic German beer like a Kölsch or Hefeweizen for an authentic experience.
    • Add More Veggies: Try incorporating other vegetables such as carrots or potatoes into the sauerkraut for extra nutrition.

    German Feast (Sausage Platter with Sauerkraut)

    FAQ

    Q1: Can I prepare this dish in advance?
    Yes! You can prepare the sausages and sauerkraut a day before. Simply reheat on the stovetop before serving.

    Q2: What sides go well with this German feast?
    Apart from rye bread or pretzels, consider serving with potato salad or a fresh green salad.

    Q3: How do I store leftovers?
    Store any leftovers in an airtight container in the refrigerator for up to 3 days.

    Q4: Is sauerkraut healthy?
    Yes, sauerkraut is rich in probiotics, vitamins, and dietary fiber, making it a nutritious addition to your meal.

    👉 Try it now

    Bring the heart of Germany to your kitchen with this Sausage Platter and Sauerkraut recipe. Gather your loved ones, whip up this delicious feast, and savor the authentic flavors. Share your experience or variations in the comments below! Happy cooking!